By Pat Wong
© 2002 Krause Publications, Inc.
This article was published in the February 2002 issue of Discoveries magazine (which is no longer in existence).
Copyright is owned by Krause Publications, publisher of Discoveries. As the author, I have
their permission to include this article on my personal website. Feel free to
print a copy
of this article for your own personal use. However, no other reproduction of this material is
allowed. Note: The printable version of this article requires Acrobat Reader on your PC, which you
can get for free
here.
Why Bother?
I swear, I think the golden age of reissued albums on CD has truly come to an end. Oh sure, the record labels throw us a few bones every now and then, but when is the last time you were able to get a truly new recording on CD that was previously available only on vinyl or cassette? I'm not talking about something that's been remastered (yet again) with a few demos and outtakes thrown in for good measure. Can't think how long ago that was? Exactly my point. And as for reissuing the LP that my youth choir made when I was in high school - well, that's obviously never going to happen.
Wouldn't You Really Rather Have CDs?
Like it or not, I think most collectors would really rather have their collections on CD. Most of them have either never had a turntable or if they do, it is no longer working. So what's the solution? Remaster your recordings onto CDR, and you can play them just about anywhere. This is something I've been doing as a hobby now for a couple of years, and I can tell you that it's truly a godsend. I have albums that I hadn't played in years until I put them on CDR - stuff like Hard Times by Peter Yarrow, which by the way is my all-time favorite album, and the self-titled album by the gospel group The Sharrett Brothers, just to name two. I've even made CD sleeves for them using the original LP jacket artwork and some photo editing software. I'm sure that if any of these albums were reissued on CD, my CDRs would compare favorably with the reissue.
Remastering your own recordings onto CDR isn't terribly expensive to get started doing either, and doesn't require years of practice before you're good at it. With today's sound editing software it's really a no-brainer to produce CD-quality recordings. You can also do this with your old 78s, even if you don't have a turntable that plays at that speed. Would you like to learn how this whole process works? If so, start taking notes. When I'm done, you'll find your collecting efforts have been taken to a whole new level.
Computer Needs
I'll start by talking about the requirements for your computer. You need a sound card because that's what will actually transfer your recordings from your stereo to your computer. There are a lot of sound cards to choose from on the market, but just about any 16-bit stereo sound card should work for you. If you need to buy one, consider what else you may use it for besides your recording projects when you make your selection. Your computer needs to be a 486 or higher and have a minimum of one gigabyte of free hard drive memory. About half of that will be used to store your music files for a single LP. The other half will be used for temporary files when you're cleaning up the sound on your recordings. If you don't have that much free memory on your computer, don't despair. Hard drive memory is pretty cheap these days; in fact, you can buy 15 gigabytes for about $50.
Connections
You'll connect your stereo to your computer using a stereo audio patch cable between an unused Audio Out jack on your receiver/amplifier and the Line In jack on your computer's sound card. A quick trip a to your local electronics store should get you what you need.
One last point on the connection between your stereo and computer needs special emphasis. Make sure that your connecting cable between the two is not more than 15 feet long. The reason for this is that if the stereo and computer are too far apart, there will be too much resistance on the line between them, and the signal that your computer receives will sound like you're trying to receive a distant radio station. You'll also end up with some very poor recordings as a result. Obviously, this means that your computer and stereo must be very close to each other.
If this is a problem, you might want to consider rearranging your furniture a bit. In fact, here's an idea that might help. My husband bought and assembled a small rolling desk for my computer. When I record, I just push my rolling desk over by the stereo and connect everything together. When I'm done, I push the desk back to its corner of the family room. This is just an idea to help you think about the kind of furniture arrangement that might work best for you.
Other Stuff Needed

Although some people might consider this optional equipment, I've found it important to have headphones plugged into the Line Out jack on your sound card. This will enable you to hear your recordings just the way they sound when your computer records them. You'll be able to tell, for example, if the bass is too strong or too weak, if the overall recording volume is too low or if there is some other problem. You'll also be able hear a fade-out more clearly and thus tell more precisely when to stop recording. If you need an adapter plug to fit the headphone jack into your sound card, add that to the list of things you'll need from the electronics store.
Sound Editing
OK, now you're set up with all your hardware needs. Let's talk about the software you'll need for your computer. The same software can be used for recording your WAV files onto your computer, as well as sound editing. Here are some products for your consideration. My personal favorite is Cool Edit Pro (product no longer available). Another fine product is Sound Forge [which apparently is no longer available]. If either of those is out of your price range, consider a product called Clean, by Steinberg, which runs about $130. (Sorry, no link is available). If you'd like to hold costs down even more, there's another excellent product called Goldwave, which will run you about $40. All these are fine programs, but don't take my word for it; shop around. There's plenty of sound editing software to choose from.
Regardless of the software you use, sound editing works pretty much the same way. You'll open your WAV file within your sound editing software in much the same way as you would open say, a Word document on your computer. The opened file appears with left and right channel graphs.
Getting Rid of Vinyl Noises
Hopefully, the most serious problem you'll have to overcome with your LPs is to eliminate the clicks and pops in the WAV file. Most of these will be easily overcome with the Click/Pop eliminator filter. Occasionally, you'll find that the pops aren't totally filtered out, which is usually the case when a record is scratched. In that case, you'll have to manually correct them. This is pretty easy though. The pops appear as spikes on your graph. Your sound editing software should allow for precise cursor placement on the graph so you can highlight just the microsecond's worth of sound that needs to be deleted from your WAV file. With only a little practice, you'll learn how to delete most pops in such a way that you won't be able to tell that a pop existed to begin with.
Worth mentioning is the fact that the noise reduction process can be very time consuming, depending on the quality of your source recording. I had one LP in particular, part of a 2-LP set called All This And World War II, which took an estimated 5 hours on the noise reduction process just for one of the LPs. One song in particular, Get Back by Rod Stewart, took about 30 minutes just to clean up the sound on the first 30 seconds of the song. Admittedly, this is an extreme example of the work involved. Nevertheless, it just illustrates the point that the cleaner the sound of the source material, the less time you'll spend on the noise reduction process. A good rule of thumb to use in estimating the required time for the sound cleanup process is roughly twice the length of time of the recording when the sound quality is nearly perfect to begin with. Of course, the sky's the limit for the time spent on a poor quality recording. You might be better off in that case buying another copy to work with.
Would you like to make your own two-fer? You may notice a difference in the volume between the two recordings. This problem is easily overcome using a piece of software called MP3 Workshop - and at the best price of all. It's free! Don't let the name of the software fool you; it will adjust the volume on MP3s as well as WAV files, convert an MP3 file to WAV and vice versa. This is definitely worth checking out.
Recording 78s
You'll need to go through a slightly different process with your old 78s, assuming you don't have a turntable that will play them at the correct speed. Record your WAV file at 45 rpm. Next, you'll have to resample your file to stretch it to the speed of the original recording. This is expressed as a percentage; i.e., 45 divided by 78.26 (the true speed of a 78 record), or 57.5%. If you're using Cool Edit Pro, you'll go into Transform, Time/Pitch, Stretch and enter 57.5 into the Ratio box. Click OK, and Cool Edit Pro will take care of the rest. Works like a charm, too. By the way, I can't take credit for the genius behind this. That goes to Chuck Miller, who wrote an article on the subject (in Goldmine #513, March 24, 2000) and was gracious enough to allow me to include this information from his article. Thanks, Chuck!
Burning The CD
Having gone through the necessary sound editing steps, you're now ready to burn your CD. That's really pretty easy. Just open your CD burner software that came with your burner, select Audio CD for the CDR type, then drag and drop your WAV files into the CD layout window. If you're burning a CD from a live album, you'll also select the Disc-At-Once option to eliminate the silence between tracks. Then click on Create A CD. In just a few minutes, your old recording will have taken on a new life - digitally!
Creating Sleeve Artwork
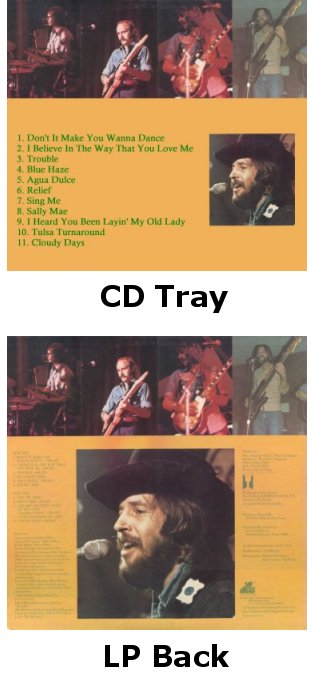
The next step is to make your CD sleeves. There really isn't a lot to making CD sleeves from cassettes. The real challenge comes from making them using the original LP jacket artwork. Here's how I do it. Because I've never found any kind of copy machine that would copy an LP jacket into a single picture, I scan the album's front cover into four pictures. The upper left corner of the LP cover becomes one picture. Then I do the same for the upper right, lower left and lower right corners. Finally, using my photo editing software I merge the four pictures into a single image. Repeat the same process for the back jacket. Your photo editing software is also good for touching up ring wear, erasing stickers that you'd rather not try to remove, and any other imperfections.
Now that you have some digital pictures to work with, you may also want to do a little bit of CD sleeve redesign. Cover art that looks great on a 12-inch square LP jacket might be completely unreadable when reduced to a CD sleeve size (4.75 inches square). It's your CD you're making the sleeve for, so get creative. Reduce the size of inset pictures on the sleeve or eliminate them altogether so you can increase the track listing portion of your picture to an eye readable font. Above all, design a sleeve that you will be proud of.
I'd recommend one of the following photo-editing software packages. By far the most features for the money will be found with Paint Shop Pro, which is available from here retailing for $99 (this is the software I use.) Another product which is a bit pricey [but is the publishing industry standard] at $609 is Adobe Photoshop. As with my other recommendations, don't just take my word for it; shop around and find a product that meets all your needs.
Labelling
If you want to have sleeves and a CD label that are as close as possible to the "real thing," consider using CD label software. There are plenty of software choices available. However, the only one I'm familiar with and would therefore be willing to recommend is from Neato. It is by far the most user-friendly software I have ever seen. You can get it at most office supply stores, or from the company at Neato.
Having walked you through this entire process, if it sounds like just too much work, or you don't have the time, patience or equipment to do this, there are companies who will do this kind of work for you. Cyrco Music [link no longer available] is a regular advertiser in Discoveries which offers this kind of service.
Disclaimer: Current copyright law permits you to make one copy, for your own personal use, of
any recording you have purchased. You are not permitted to sell or give away additional copies
of it to anyone else. Discoveries wishes to emphasize that the contents of this article
are not to be interpreted as an endorsement or promotion of copyright infringement.
I welcome your feedback on my article.
Addendum to the original text: I have corrected or removed links to websites and products which no longer exist. In addition, prices for software in the article have most likely changed since this article was originally published.
If you have questions about anything that I didn't cover, I'm always willing to help if I can. For additional resources, please check out my Vinyl Restoration sub-menu. Thanks!